Feeling overwhelmed by your new Instant Pot? This Instant Pot beginner’s guide will simplify the essentials, leaving you confident and ready to make delicious Instant Pot recipes.
I have helped millions of people learn to use an Instant Pot and I want to help you! This guide will walk you through everything you need to know–the parts of an Instant Pot, safety tips, helpful things to remember, the difference between a natural pressure release and a quick release, and a step-by-step guide through the cooking process!

What is an Instant Pot?
You may think an Instant Pot is simply an electric pressure cooker–but it is so much more! The Instant Pot is a multi-function pressure cooker that while it does pressure cook, it also incubates yogurt, sautés, works as a rice cooker, and can slow cook–with some caveats! And thanks to many safety features, it is much safer to use than an old-school stove-top pressure cooker.
After mastering the basics, the Instant Pot has become one of my most used kitchen appliances. It develops incredible flavor in chili and tenderizes pot roast in record time. Make the best hard-boiled eggs, perfectly cooked rice, and can cook unsoaked dried beans.
Once you master the basics, you too, are going to LOVE your Instant Pot!
Instant Pot Parts
Before we talk about how the Instant Pot works, let’s break down the standard pieces and parts of the Instant Pot so you know which piece is which and how to clean each part.
- Base Unit: this contains the heating element and should never be immersed in water.
- Inner Pot: The stainless steel inner pot that fits inside the base unit and essential for cooking. It is removable for washing and is dishwasher safe.
- Instant Pot Lid: The lid will vary base on the model. While dishwasher safe, I typically wash it by hand.
- Sealing Ring: Silicone ring on the bottom side of the lid that ensures pressure is reached and the lid locks. It is removable and should be cleaned often and replaced if any tears or stretching occurs. Consider having separate rings for savory and sweet dishes, as it tends to absorb flavors of what you cooked.
- Steam Release Valve/Venting Knob: On the top of the lid and is often removable and should be washed by hand.
- Floating Valve: Indicates when the pot is pressurized and locks the lid during pressure cooking.
- Shield: The shield prevents food from getting trapped in the pressure release valve.
- Condensation Cup: Collects excess moisture from the cooking process or when doing a quick release. It is removable and should be washed by hand occasionally.
- Trivet: Metal rack used for cooking items above liquid, like potatoes or pot-in-pot cooking. Dishwasher safe.

Basic Functions
While a lot of models have tons of pre-set function for cooking various things, it is best to set the cooking time using the manual or pressure cook button, not the rice, meat, or grains button. You will find many of the pre-set cooking modes on the Instant Pot useless.
- Pressure Cook/Manual: Controls cooking time—your go-to button.
- Sauté: Allows browning and simmering directly in the pot.
- Keep Warm: Automatically keeps food warm after cooking.
- Slow Cook: Can work, but the temperature and time will need to be modified to get accurate results.
- Yogurt: Used to make and incubate Instant Pot yogurt.
- Adjust/Temp-Pressure: Depending on the model you have, use the adjust or temp/pressure function to control the pressure (change from high to low pressure) and temperature of the instant pot when using the slow cooking, making yogurt, or using sauté function.
Step-By-Step Instructions Instant Pot Cooking
To get started, it is best to cook water before trying actual food. This is called a water test and will help you get familiar with your Instant Pot before you waste any food.
- Set up the Instant Pot. Be sure the inner pot is secured in the base of the Instant Pot and your cord is securely attached to the unit and plugged into a working outlet.
- Add Ingredients. Pour 3 cups of water into the inner pot.
- Secure Lid. Check to ensure the seal is tightly secured on the lid and then place the lid on the Instant Pot. Ensure the steam release valve is pointed towards sealed or locked into place.

- Set Cooking Time. To set the cooking time, hit the manual or pressure cook button. Ensure HIGH pressure is indicated on the screen (this is the default). If not, hit the pressure button until HIGH is lit up. Then use the plus or minus until the screen reads „3.” If your screen flashes the time, you need to press start. For most models, the Instant Pot will beep and turn itself on.

- What to Expect. The Instant Pot screen will read „ON” until pressure is reached. Once pressure is reached, the float valve will float up and the pressure cooking cycle will begin and time will display on the screen and count backward. After the cooking time has elapsed the Instant Pot will default to holding the food warm. The display screen will show count upward showing time elapsed since cook time completed. (It is NORMAL to hear a small amount of hissing while the Instant Pot works to come to pressure.)


- Release Pressure. Based on the recipe’s instructions, allow the pressure to release naturally (leave the Instant Pot alone until the floating valve floats down and the lid unlocks) or do a quick release of pressure (CAREFULLY move the steam release knob from sealed to venting). See more details on the difference between natural pressure release and quick release.
- Turn Off the Instant Pot. To turn your instant pot off, hit the cancel button. Be sure to clean the lid and inner pot and let fully dry before assembling the Instant Pot back together.
How to Release Pressure Safely on an Instant Pot
When it comes to releasing pressure you need to know if you should do a natural pressure release or a quick release of pressure–and how to do each.
- Natural Pressure Release (or NPR) is when the pressure is slowly released on its own. This is when you leave your Instant Pot alone and allow the float valve to float down on its own. It is best to use a natural release for meats to keep them tender, recipes with high starch (like rice or grains), and recipes with a high volume of liquid.
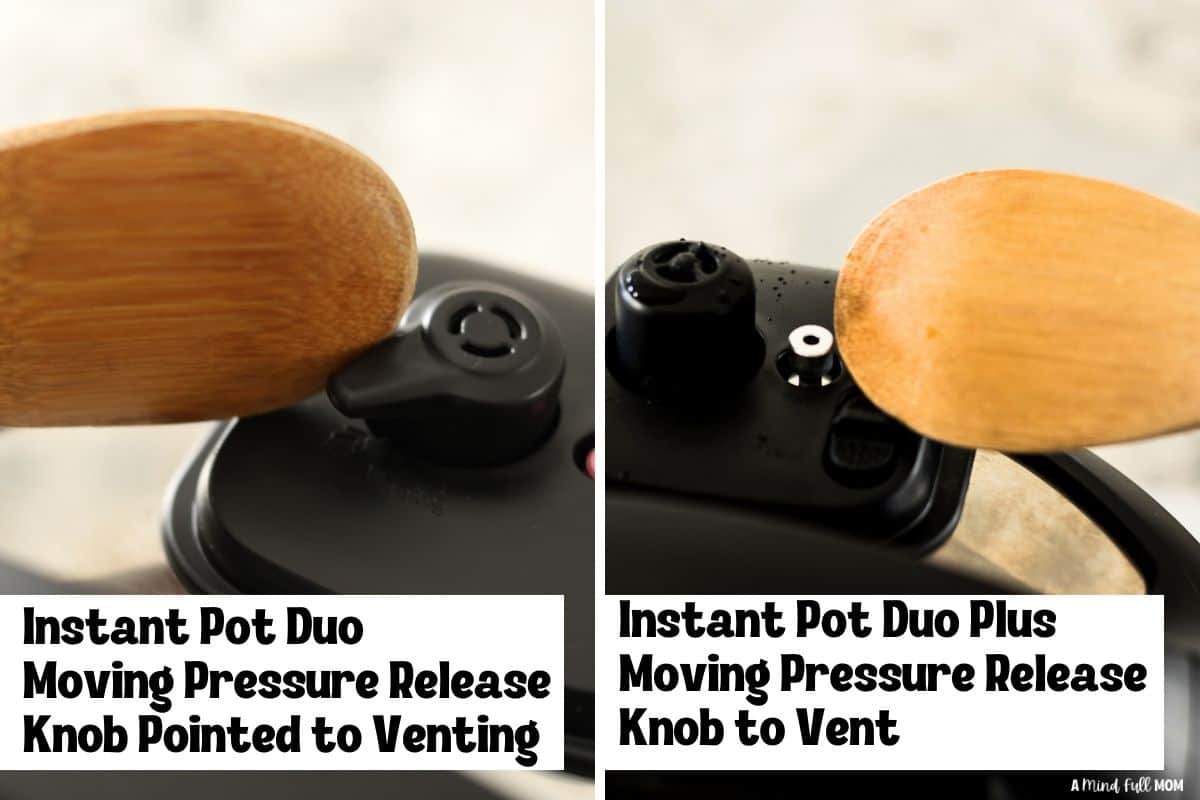
- Quick Release (or QR) is when you manually turn the valve to „Vent” and allow the pressure that has been built up to release rapidly. This method is used for things like seafood or delicate vegetables. To do a quick release of pressure, use the long handle of a wooden spoon to manually turn the valve from sealed to venting (for Duo knock the venting knob and for Duo Plus use the vent release button) AND STAND BACK to prevent yourself from getting burned by the steam.
Important Safety Tips
Instant Pots are overall deemed much safer to use than stovetop pressure cookers, as the lid remains locked until the pressure has been released. That said it is crucial to still use care–just as you do with any appliance.
- Never Put Your Face Near the Steam Release Valve. While the Instant Pot is on or when doing a release of pressure, always stand back and distance your face from the vent knob. This is where extremely hot steams can/will escape and can easily burn.
- Never Force the Lid Open. Wait until the float valve floats down or the lid is unlocked to open the lid.

Key Things to Remember
- Liquid is Key: Always use thin liquid (water, broth, beer, juice, etc.) to achieve and maintain pressure. Based on the size of your Instant Pot use at least the following amounts:
- ½ cup for a 3-quart model
- 1 cup for a 6-quart model
- 1½ cups for an 8-quart model
- 2 cups for a 10-quart model.
- Use Cold/Room Temperature Liquid. Don’t be tempted to heat your thin liquid to try to get the Instant Pot to reach pressure faster. This will result in undercooked or unevenly cooked items.
- Don’t Overfill: Keep the inner pot below ⅔ full (using the max fill line) or ½ full for starchy foods, like rice or pasta.
- Prevent a Burn Notice: After sautéing anything inside an Instant Pot, be sure to add thin liquid and scrape the bottom of the inner pot to remove browned bits off the bottom of the inner pot.
- Layer Correctly: It is best to add tomato-based products (like spaghetti sauce or salsa) last and avoid stirring into the other ingredients to avoid burn warnings.
- Cooking Time is NOT the Total Time. Instead, you need to account for the time it takes for the Instant Pot to come to pressure and time for the pressure to release naturally. Depending on how full your Instant Pot is and the recipe, this could add 30-60 minutes to the overall time.
- Cooking at high altitude? Use my guide for Instant Pot High Altitude Cooking.
Troubleshooting Common Issues
I have a very detailed instructions for how to troubleshoot common Instant Pot issues, but I wanted to highlight a two of the most common issues people have.
- The Instant Pot will not come to pressure. First check to be sure the steam release valve is locked. If it is is, check the sealing ring on the bottom of the lid. The inner ring can cause the MOST issues when it comes to pressure cooking. You need to be sure it is always tightly inserted on the lid. If you notice any tears on your inner ring, or it becomes loose over time, be sure to immediately replace it.
- The Instant Pot flashes burn or ovrht. This indicates your instant pot has overheated and something is burned to the bottom of your inner pot. The most common issues for this are not using enough thin liquid OR using dairy or thick sauces on the bottom of the inner pot.
Instant Pot 101 Video
If you learn better through video, be sure to catch me teaching you how to use your Instant Pot in the video below.
My Most Popular Instant Pot Recipes
Which Instant Pot is Best?
If you have yet to choose an Instant Pot, I am happy to help you decide. Most recipes are developed for 6-quart models but if you have a larger family you may opt for an 8-quart model. Single households may prefer a 3-quart model.
As for the type of model, simple is best in my opinion. I have tested a lot of models and find that the Instant Pot 7-in1 Duo does everything I need and the least finicky model–and usually one of the least expensive models to boot!
Must-Have Instant Pot Accessories
I am often asked what are my favorite Instant Pot Accessories, I try to keep things super simple, but these are my favorite accessories and why you may need them.
I really, truly hope you LOVE your Instant Pot! -Kristen